Have you ever sat down to enjoy your favorite movie or game, only to be disappointed by dull colors, washed-out scenes, or overly bright highlights that burn your eyes? I’ve been there — spending hours fiddling with my TV settings, chasing that perfect picture, only to end up frustrated and overwhelmed. That moment of realization hit me hard: getting optimal Mini LED HDR and contrast settings isn’t about blindly following presets. It’s about understanding the nuances that make scenes pop and details stand out. If you’re tired of lackluster visuals and want your TV to truly shine, stick around. Today, I’ll share practical insights from my own journey and show you how to unlock the full potential of your Mini LED display for stunning clarity and vibrant contrast.
Why Fine-Tuning Your Mini LED HDR & Contrast Matters
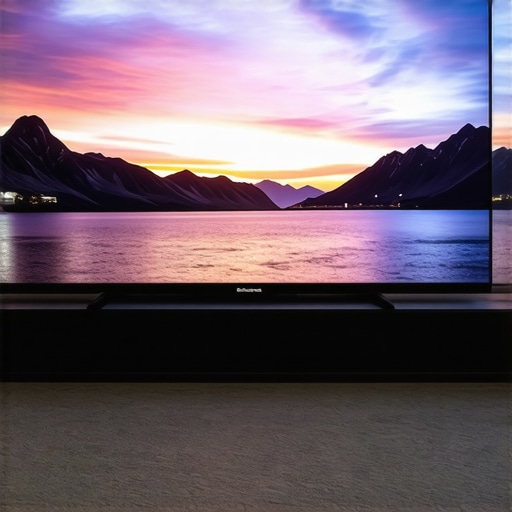
Mini LED technology has revolutionized home viewing, offering higher brightness levels and better contrast than traditional LED TVs. But here’s the catch: without proper calibration, even the best screens can underperform. When I first got my Mini LED TV, I assumed that setting it to standard “Movie Mode” would suffice. Spoiler alert — it didn’t. Scenes lacked depth, shadows were flat, and bright highlights felt artificial. That’s when I realized that mastering HDR and contrast isn’t just a technical detail; it’s the secret to experiencing content as the creators intended. Proper settings can elevate your viewing experience, making everything from cinematic explosions to subtle textures genuinely immersive. If you’re wondering whether this is worth the effort, I’ll tell you — it absolutely is. And I’ll guide you through the process step by step.
Is HDR Brightness Control Overhyped or Essential?
Early on, I made the mistake of cranking up the HDR brightness to the maximum, thinking brighter meant better. Turns out, that’s not the case. Overdoing it washes out details and diminishes contrast. Instead, I learned to balance brightness with black levels and local dimming features, which is crucial for achieving that vivid, cinematic look. For a deeper dive into this topic, check out this guide on HDR brightness mastery. Trust me, a little moderation and fine-tuning go a long way in creating a picture that’s both vibrant and natural.
Now that I’ve shared my initial pitfalls and what I’ve learned, let’s get into the practical steps you can take to optimize your Mini LED HDR and contrast settings for 2024. Ready to transform your TV into a visual powerhouse? Let’s go.
Dial in Brightness for Vivid Scenes
Start by setting your TV to a bright environment and switch to HDR mode. Use a well-optimized HDR brightness setting by referencing this guide on HDR brightness mastery to avoid washing out details. Think of it like tuning a musical instrument — too high and the sound distorts, too low and it’s flat. Adjust the brightness slider gradually, observing how dark areas gain depth without losing highlight details. My own experience was messy at first — I cranked it up too high and lost shadow nuances, but after several tweaks, I achieved a balanced contrast that made scenes pop without artificial glare.
Fine-Tune Local Dimming for Depth
Mini LED technology shines when local dimming is optimized. Access your TV’s contrast control settings via this comprehensive guide. Think of local dimming as a spotlight operator — it highlights bright objects in a scene while keeping the background dark. Reduce the local dimming level if you notice blooming or halos around bright objects, but increase it for richer blacks. I once set mine too low, and the picture looked flat. After experimenting, I found a sweet spot that preserved black levels and made bright elements stand out vividly, transforming my viewing experience.
Adjust Black Levels for True Contrast
Black level calibration is critical. Use a test pattern or a dark scene to set the black level, ensuring blacks are deep but not crushed. Align this with the overall brightness to maintain detail in shadows. I used a scene from a noir film, slowly lowering the black level until shadows looked rich yet detailed. This step makes a noticeable difference, especially in dark scenes, where proper contrast reveals textures and subtle gradations. For precise control, consult this resource for contrast tips tailored to Mini LED displays.
Utilize Gamma and Color Settings
Adjust gamma to fine-tune midtones — a key step in balancing contrast. Typically, setting gamma around 2.2 gives a natural look, but tweak it slightly for personal preference. Also, calibrate color temperature to warm or neutral, depending on your content. Remember, these settings influence contrast perception, so small adjustments can have a big impact. I recommend using test patterns to see how each change affects overall picture quality, ensuring scenes are vibrant without oversaturation.
Test with Real Content and Iterate
Finally, test your settings with actual movies or games. Look for scenes with a mix of bright and dark elements, like explosions against night skies. If highlights are too harsh or shadows lack detail, revisit your adjustments. It’s an iterative process — I spent a weekend fine-tuning, but the payoff was worth it. Every scene now feels immersive, with crisp contrast and vibrant HDR. Remember, your ideal settings depend on your environment and personal taste, so don’t be afraid to experiment.

Many enthusiasts believe that cranking up their TV’s contrast or local dimming settings will automatically deliver stunning images. However, this is a misconception that can lead to suboptimal viewing experiences. In my experience, pushing contrast levels too high often results in blooming artifacts, where bright objects bleed into dark areas, reducing overall image clarity. Instead, a nuanced approach that balances contrast with black level calibration and local dimming adjustments yields far better results. For example, excessive contrast can cause highlights to become unnatural, diminishing the realism of HDR content. To truly elevate your picture, it’s crucial to understand that more contrast isn’t always better. Fine-tuning these settings in tandem allows for vivid yet natural visuals, avoiding the common trap of over-optimization. For detailed guidance, check out this comprehensive contrast control resource.
Keeping your Mini LED HDR display performing at its best over time requires a combination of the right tools and regular maintenance routines. As technology advances, so do the methods for ensuring your setup remains pristine and reliable. In my experience, investing in specific calibration tools and adopting disciplined maintenance habits can significantly extend the lifespan and visual quality of your display.
Why Invest in Calibration Equipment
Precision calibration is the cornerstone of long-term performance. I personally rely on a colorimeter like the X-Rite i1Display Pro because it offers accurate readings of color accuracy, gamma, and white balance. This device allows me to run periodic calibration checks, ensuring my display’s settings remain optimal despite environmental changes or aging components. For more advanced users, combining the colorimeter with professional calibration software like CalMAN or DisplayCAL can provide granular control and detailed reports, helping maintain consistent picture quality.
Regular calibration prevents issues like color drift or contrast loss, which can occur gradually over months. I recommend scheduling a calibration every 3 to 6 months, especially if you notice subtle shifts in picture quality. This proactive approach ensures your display continues to deliver vibrant HDR content without the need for costly repairs or replacements.
Routine Maintenance for Longevity
Beyond calibration, simple routine maintenance can keep your Mini LED display functioning smoothly. Keep the screen free of dust and fingerprints by using a soft microfiber cloth. Avoid harsh chemicals; instead, opt for manufacturer-recommended screen cleaners. I like to gently wipe my screen weekly, focusing on edges and corners where dust tends to accumulate.
Additionally, firmware updates are crucial. Manufacturers often release updates that optimize contrast algorithms, local dimming performance, and overall stability. Regularly check the manufacturer’s support site or enable automatic updates if available. This ensures your TV benefits from the latest enhancements and security patches, reducing the risk of bugs that could impair performance.
How do I maintain HDR and contrast settings over time?
Consistent viewing conditions are essential. As ambient lighting conditions change, you may need to tweak contrast or brightness slightly. Always use test patterns and reference scenes to verify settings. Monitoring your display’s performance and making incremental adjustments helps maintain optimal picture quality, especially after firmware updates or environmental changes.
Looking ahead, I believe the future of display maintenance will involve smarter calibration tools integrated directly into TVs, allowing for automatic adjustments based on ambient light sensors and usage patterns. Until then, a dedicated colorimeter and disciplined routine will serve you well.
Don’t forget—try out the advanced calibration technique of periodic recalibration with your colorimeter. It’s the most effective way to keep your Mini LED HDR display looking its best for years to come. For more detailed guidance, check out this resource on maintaining high contrast and brightness.
Throughout my journey with Mini LED TVs, I discovered that the real secret to breathtaking visuals isn’t just about high brightness or aggressive contrast but about understanding the nuanced interplay of settings. One of my most valuable lessons was realizing that pushing contrast too high can cause blooming artifacts that ruin the immersive experience. Instead, fine-tuning local dimming and black levels in unison creates a natural, vibrant picture that truly pops. This insight taught me to approach calibration with patience, treating my TV like a delicate instrument rather than a power tool — subtle adjustments make all the difference. If you’re eager to elevate your viewing, remember that mastering these settings requires experimentation and a keen eye for detail, but the reward is a display that rivals cinema quality at home.


Leave a Reply