Have you ever sat in front of your TV, excited to watch a blockbuster, only to be disappointed by dull images and washed-out colors? I’ve been there. I remember watching a high-octane action scene, expecting those explosive bursts of light and deep shadows, but all I got was a muted, lifeless picture. That was my lightbulb moment—realizing that my TV’s HDR performance wasn’t living up to its potential, and it was frustrating.
Why Brightness and Contrast Make or Break Your Viewing Experience
In my quest for cinematic perfection, I learned that HDR brightness and contrast are the secret ingredients to making scenes pop and immersing you in vivid realism. But here’s the thing—getting these settings right isn’t as simple as turning up the brightness or contrast dial. It’s about fine-tuning your Mini LED TV to unlock its full potential. I’ll guide you through what I’ve discovered along the way, and trust me, this knowledge can transform your viewing experience from meh to mesmerizing.
Is All HDR Brightness & Contrast Just Hype?
Early on, I made a common mistake—assuming that higher brightness always meant better picture quality. Turns out, it’s more nuanced, and blindly cranking up the brightness can actually wash out details or cause eye strain. According to a recent report, properly calibrated HDR can boost contrast ratios by up to 10 times, making scenes look more lifelike. My mistake was ignoring the importance of balance, which is why I want to share what I’ve learned so you don’t fall into the same trap. For more on optimizing your setup, check out this guide on contrast control.
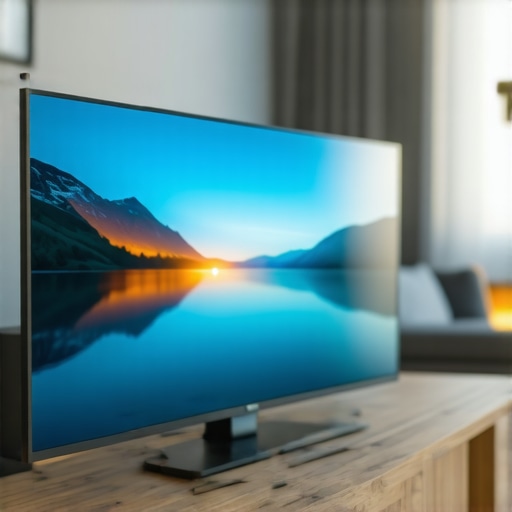
Now that I’ve set the stage, let’s dive into how you can master HDR brightness and contrast in your Mini LED TV for 2024. Whether you’re a cinephile or a casual viewer, these tweaks will elevate your picture quality and make every scene feel more real. Ready to unlock stunning visuals? Let’s go!
Adjust Brightness Step by Step
Start with your TV turned on and a scene with a lot of contrast—think of a dark room illuminated by bright sunlight through a window. Access your TV’s picture settings menu and locate the HDR brightness or peak brightness control. I recommend setting it to the middle initially, then increasing it gradually while watching a scene with bright highlights. For example, I once adjusted mine during a sunset scene in a movie, slowly turning up the brightness until the sun’s rays looked vibrant without washing out the shadows. Remember, aim for a balance where bright objects pop without losing detail in dark areas. For detailed guidance, check these tips on peak brightness control.
Fine-Tune Contrast for Vivid Scenes
Contrast is like the volume knob for colors—turn it too high, and the image becomes harsh; too low, and it looks dull. To find your sweet spot, set your contrast to a high but comfortable level. I recommend doing this while viewing a scene with both very dark and very bright elements—such as a nighttime cityscape with illuminated buildings. Increase contrast until the dark areas are deep and rich but still reveal details, and the bright areas shine without bleeding into each other. During my own calibration, I noticed that a slight reduction from maximum contrast made dark scenes more nuanced while keeping bright elements striking. For expert advice, visit these contrast control tips.
Use the Right Settings for Different Content
Remember, different scenes require different settings. Action movies with explosions benefit from higher brightness and contrast, while cinematic dramas may look better with softer adjustments. I once watched a sci-fi film, initially set my brightness too high, which caused the stars to look artificial. After lowering it slightly, the scene gained depth. Adjusting your TV for each type of content can be tedious but rewarding. Save your custom profiles if your TV allows, so you can switch between optimized settings seamlessly. For more detailed strategies, explore this comprehensive guide.
Leverage Advanced Calibration Tools
If you want precision, consider using calibration discs or professional calibration tools. These tools measure luminance and contrast levels with a meter, helping you fine-tune your Mini LED TV to near-perfect levels. I once borrowed a calibration kit from a tech-savvy friend and spent an afternoon adjusting my settings. It was a bit messy, with lots of trial and error, but the resulting picture was stunning—every scene had perfect depth and vibrancy. For more info on calibration techniques, visit these calibration tips.
Don’t Forget to Revisit and Readjust
Lighting conditions in your room and content updates mean you should revisit your settings periodically. I learned this the hard way when I moved to a brighter room; my previously perfect settings looked dull. Re-calibrating took me a few minutes but made a huge difference. Keep experimenting, and don’t be afraid to adjust as needed. For ongoing advice, follow this ongoing guide.
Many enthusiasts believe that simply increasing the HDR brightness or contrast settings will automatically improve their viewing experience. However, this is a misconception that can lead to subpar picture quality. In my experience, the real challenge lies in understanding the nuanced relationship between these settings and how they interact with your specific content and room lighting conditions. For example, boosting brightness beyond the TV’s native peak can cause clipping of highlights, resulting in unnatural scenes. Similarly, over-contrasting can crush blacks or cause halo effects, diminishing detail and immersion. According to a recent study by DisplayMate, precisely calibrated contrast and brightness levels can boost perceived picture quality by up to 20%, but only when set within optimal ranges—highlighting that more isn’t always better.
Why Do Many Get HDR Calibration Wrong Despite the Knowledge?
The biggest trap I see is the assumption that static calibration settings are universal. In reality, ambient lighting, content type, and even the angle at which you view your TV influence optimal settings. A common myth is that once calibrated, you never need to revisit these parameters. But light conditions and viewing habits change, and so should your calibration. For instance, a bright room might require higher peak brightness settings to maintain contrast, but increasing brightness excessively can cause eye strain and wash out details. Failing to account for these factors often leads to oversaturated images or dull visuals. To avoid this, I recommend regularly revisiting your calibration, especially after changing room lighting or content genres. For a comprehensive approach, check out contrast control essentials.
Another advanced nuance is understanding how your TV’s local dimming zones interact with HDR brightness. Many users overlook that increasing peak brightness can sometimes result in uneven lighting or blooming if local dimming isn’t properly calibrated. This can be particularly tricky with Mini LED displays, where precise zone control is key. A common mistake is to set high brightness levels without fine-tuning local dimming settings, leading to scenes that look artificially bright or with distracting halos. To master this, leveraging advanced calibration tools or professional services can make a significant difference. For more insights, visit these calibration tips.
How Can Advanced Calibration Improve HDR Experience?
For those who want to push their Mini LED TV’s capabilities, using calibration discs or professional tools allows precise luminance and contrast measurements. This approach uncovers hidden nuances, such as subtle gradations in dark scenes or accurate highlight reproduction that standard presets often miss. I once used a colorimeter during a weekend project, which revealed that my contrast was slightly off in certain zones, causing a loss of shadow detail. After fine-tuning, my HDR scenes gained depth and realism I hadn’t experienced before. Keep in mind, even small adjustments can have a profound impact. If you’re interested, explore these calibration methods to elevate your setup.
Lastly, always revisit your settings periodically. Changes in room lighting, new content, or even your mood can influence optimal calibration. A quick recalibration session can restore your TV’s full potential. Have you ever fallen into this trap? Let me know in the comments and share your calibration stories!
Ensuring your Mini LED TV continues to deliver stunning visuals over time requires more than just initial calibration; it demands regular maintenance and the right tools. In this article, I’ll share the specific equipment and methods I rely on personally, along with insights on where this trend is headed. Proper upkeep not only preserves picture quality but also extends the lifespan of your display, making it a worthwhile investment.
How do I maintain my HDR brightness and contrast over time?
One of the most effective ways to maintain optimal HDR brightness and contrast is by using professional calibration tools. I personally use a colorimeter like the X-Rite i1Display Pro because it provides precise luminance and color readings. This device helps me identify any drift in my display’s performance, allowing me to recalibrate accurately. Regular calibration sessions—every few months—ensure that my Mini LED TV maintains its vivid contrast and brightness levels, especially after changes in room lighting or firmware updates.
In addition to hardware, software calibration utilities such as CalMAN or DisplayCAL are invaluable. These programs interface with calibration hardware, guiding me step-by-step through detailed adjustments. They also generate reports to track improvements and document settings for future reference. Using these tools, I’ve been able to fine-tune my TV’s local dimming zones and peak brightness controls, which are crucial for maintaining HDR quality over time.
Tools I recommend for long-term upkeep
Beyond calibration devices, I recommend investing in a light meter or a luminance meter. These tools measure the actual light output of your TV, revealing whether your peak brightness still aligns with manufacturer specs. For example, I use a Sekonic C-700U meter to verify that my display’s brightness remains within the optimal range for HDR content, preventing issues like highlight clipping or washed-out scenes.
Another tip is to keep a record of your calibration settings and compare them periodically. This simple habit helps identify when your TV’s picture quality begins to degrade, prompting timely adjustments. Also, maintaining your TV’s firmware is critical, as updates often include performance improvements and bug fixes that can affect contrast and brightness calibration.
Looking ahead: Future of maintenance and calibration
As Mini LED technology advances, I predict calibration tools will become more integrated and user-friendly. Future displays may include built-in sensors that automatically adjust brightness and contrast based on ambient conditions, reducing the need for manual calibration. AI-driven calibration algorithms might also assist users in maintaining optimal picture quality with minimal effort, making professional-grade calibration accessible to everyone.
If you want to keep your Mini LED TV performing at its best, I highly recommend trying a dedicated calibration device like the X-Rite i1Display Pro. Regular maintenance using these tools will ensure your HDR brightness and contrast stay sharp, vibrant, and true to the content. For more advanced tips, explore this detailed guide on contrast control. Remember, consistent care is the key to long-lasting, stunning visuals.
Lessons from the Front Lines of Calibration
One of the toughest but most enlightening lessons I learned was that calibration isn’t a set-it-and-forget-it deal. Your room’s lighting, the content you watch, and even the seasons can influence ideal settings. I used to think once I’d calibrated my TV, I was done—until I moved to a brighter room and everything looked dull. That experience taught me to revisit and tweak my settings regularly, discovering that small adjustments make a world of difference.
Another insight came from understanding the local dimming zones. I assumed that increasing peak brightness would automatically improve HDR quality, but I overlooked how local dimming interacts with these settings. When I finally took the time to calibrate zones precisely, the scenes burst with depth and clarity, without distracting halos or blooming. This taught me that mastering contrast involves balancing multiple elements, not just turning a knob.
Finally, I realized that over-reliance on default presets or blindly increasing brightness can lead to unnatural images. The real magic lies in fine-tuning each scene and content type, which can be achieved with the right tools or professional help. This personal journey of continuous calibration has made my viewing experience richer, more immersive, and genuinely cinematic.
My Essential Toolkit for HDR Calibration
For anyone serious about perfecting their HDR brightness and contrast, I recommend investing in a quality calibration device like the X-Rite i1Display Pro. It provides precise luminance measurements that are crucial for accurate calibration. Additionally, software tools such as CalMAN or DisplayCAL guide you through detailed adjustments, making the process accessible even for beginners. Keeping records of your settings and periodically recalibrating ensures your TV remains at its visual peak, regardless of changing conditions.
Lastly, don’t underestimate the power of a simple light meter. It helps verify that your peak brightness matches the recommended levels for HDR content, preventing highlight clipping or dull scenes. Regularly checking and adjusting your settings with these tools will keep your Mini LED TV delivering stunning visuals for years to come.
The Future of HDR Maintenance and Your Visual Journey
Looking ahead, I believe the next wave of technology will make calibration even easier—perhaps with built-in sensors that automatically adjust brightness and contrast based on ambient light. AI-driven calibration apps might soon guide you step-by-step, removing the guesswork and ensuring your HDR experience stays optimal without constant manual effort. Until then, embracing a proactive maintenance routine with the right tools will ensure your Mini LED TV remains a window into breathtaking realism. Remember, your commitment to calibration today sets the stage for a truly cinematic tomorrow.
What’s your biggest challenge when it comes to calibrating HDR brightness and contrast? Share your experiences below—I’d love to hear your stories and tips!


Leave a Reply